If you are looking for a bigger screen for your laptop presentations, connecting it to a projector is an excellent solution. This way, you can display your documents, slides, and media to a large audience without struggling to make them all see your small screen. However, the process of connecting a laptop to a projector can be tricky, especially if you are dealing with different ports or trying to go wireless. That’s why this article will guide you through all the steps you need to know to connect your laptop to a projector effortlessly. Whether you want to use DVI, VGA, HDMI, or Thunderbolt cables, or you prefer to cast your display wirelessly, this article has got you covered. Additionally, you’ll learn some troubleshooting tips, and discover apps that can enhance your projection experience. Keep reading to become a projection expert!
How to Connect a Laptop to a Projector with Different Ports

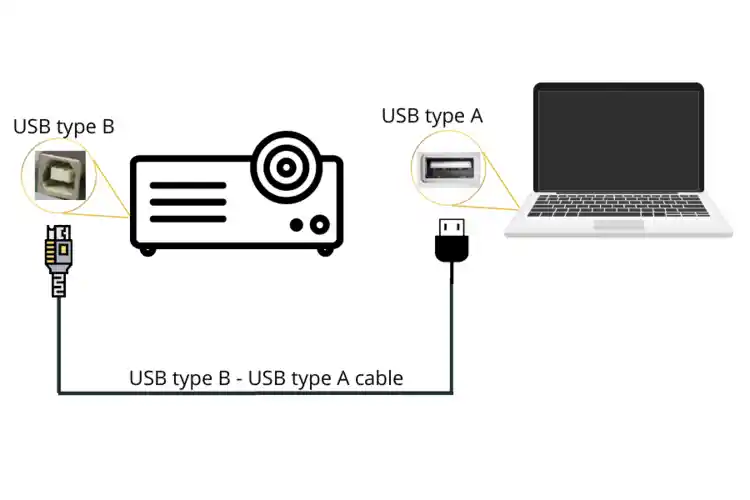
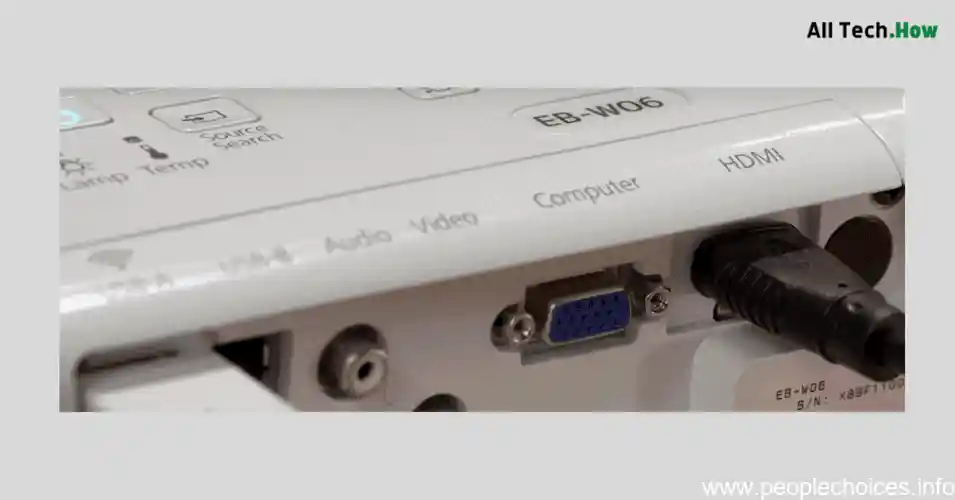
If you want to know how to connect a laptop to a projector, it is important to first identify the ports on both devices. Depending on the type of projector and laptop you are using, you may have different ports available, including DVI, VGA, HDMI, and Thunderbolt. Once you have identified which ports you are working with, you can use the appropriate cables to match them up and make the connection.
To configure the display settings, you can access the Display Settings on your laptop and select “Extend” from the list of options. This will enable you to project your screen onto the projector and see what is displayed on your laptop. In some cases, you may also need to adjust the resolution or scale to ensure the projection looks good. If you encounter any issues during the connection process, you can troubleshoot by checking for driver updates, ensuring that cables are securely connected, and resolving scaling or resolution issues. By following these steps, you can enjoy a seamless projection experience and get the most out of your laptop and projector setup.
Identifying the ports on your laptop and projector
Are you looking to connect your laptop to a projector with different ports? It’s easier than you think. First, you’ll need to identify the ports on both devices. The most common types are DVI, VGA, HDMI, and Thunderbolt. Once you’ve determined which ports you have, simply match them using the appropriate cable. Remember to make sure all cables are securely connected. Once you have your connection, configure the display settings on your laptop and projector to optimize your viewing experience. Don’t worry if you run into issues along the way. Troubleshoot common problems such as driver updates and compatibility issues. Another option is to try connecting wirelessly using Miracast technology or a wireless display adapter. For an even smoother projection experience, try utilizing apps like ProjectorPlug or Otter.ai to improve wireless projection and efficiency during meetings. Finally, don’t forget to optimize your display settings for the best possible viewing and use keyboard shortcuts for quick access to settings.
Matching ports using DVI, VGA, HDMI or Thunderbolt cables
Are you struggling to connect your laptop to a projector with different ports? Don’t worry, it’s easier than it seems. The first step is to identify the ports on both your laptop and the projector. Most projectors have VGA, HDMI, DVI, or Thunderbolt ports, while laptops may have different types of ports. Once you have identified the ports, connect them using the corresponding cables. For example, connect a VGA port with a VGA cable. After connecting the cables, configure the display settings on your laptop and projector to match. You may need to change your laptop’s display settings to mirror the screen or use extended display mode. By following these steps, you can connect your laptop to any projector, regardless of the ports.
Configuring display settings on your laptop and projector
Connecting a laptop to a projector can be challenging, especially when they have different ports. The good news is that there are various ways to connect them. First, you need to identify the ports on both the laptop and projector. Once you have identified the ports, use a suitable cable like DVI, VGA, HDMI, or Thunderbolt cables to connect the two devices. The most popular port to use is HDMI as it is compatible with both Windows and Mac devices. After connecting them, configure your laptop’s display settings to mirror or extend your desktop. Your projector may also have settings to adjust the resolution, which you should also configure to improve display clarity. By matching your ports and tweaking your settings, you can seamlessly connect your laptop to the projector for presentations, movie nights, or any other needs you may have.
Connecting a Laptop to a Projector Wirelessly

If you need to give a presentation or simply want to watch a movie on a larger screen, it’s helpful to know how to connect your laptop to a projector wirelessly. One easy way to achieve this is by using Miracast technology, which mirrors your laptop display onto the projector screen. This technology allows for a hassle-free connection without any additional cables or adapters needed. Another option is to set up a wireless display adapter, which connects to your projector through HDMI. This solution works with both Windows and Mac laptops, but keep in mind that your device’s System Preferences or Settings may need to be adjusted to enable the wireless display. Once you are connected, make sure to optimize your display settings for the best viewing experience, and consider using apps like ProjectorPlug to wirelessly cast your screen or Otter.ai for improved meeting efficiency.
Using Miracast technology to mirror display
Connecting a Laptop to a Projector Wirelessly can be a lifesaver when you’re short on cables or when you want to avoid trip hazards. You can use Miracast technology to mirror your display without any wires or adapters, making your setup process easier. Miracast is supported on a variety of devices, including Windows, Mac, Android, and even some smart TVs. If you’re looking for an easy-to-use wireless adapter, you can try out the Apple TV or Google Chromecast. With either of these options, you can wirelessly connect to your projector with just a few taps on your phone. Keep in mind that these adapters may have limited compatibility with certain laptops, so it’s best to do your research before making a purchase. When wirelessly connecting to your projector, be aware of possible latency issues, as you may experience a slight delay between what’s displayed on your laptop and the projector.
Setting up a wireless display adapter
In this day and age, it is important to have the ability to connect a laptop to a projector wirelessly. Fortunately, there are two options that can help make your presentation experience much more seamless. First, Miracast technology can be used to mirror display from your laptop to a projector. All you have to do is make sure both devices are Miracast enabled and connected to the same network. Secondly, you can set up a wireless display adapter which essentially acts as an external graphics card that is connected to your laptop via USB or HDMI. Both of these options are ideal for anyone looking for a cable-free presentation experience. Keep in mind that when using wireless connections, the image quality and connection strength can be affected by your network and distance from the projector. Nonetheless, with the right configuration and compatible devices, going wireless has never been easier!
Troubleshooting Common Connection Issues

When it comes to connecting a laptop to a projector, you may run into common connection issues. This can include driver updates, compatibility issues, or display scaling and resolution issues. It’s important to ensure all cables are securely connected and matched using DVI, VGA, HDMI or Thunderbolt cables. If you’re experiencing issues, try updating drivers or adjusting your display settings in Windows or Mac System Preferences. Additionally, utilizing keyboard shortcuts like Windows + P or selecting system display can also help troubleshoot and resolve any issues. By following these steps and ensuring everything is set up correctly, you can avoid common connection problems and ensure a seamless projection experience.
Checking for driver updates and compatibility issues
Sometimes, things just don’t go according to plan, and this is also true when connecting your laptop to a projector. In this subheading, we’ll cover some common connection issues and how you can troubleshoot them. The first step is to check for driver updates and compatibility issues. Some projectors may not be compatible with your laptop’s operating system or require an updated driver to function correctly. Next, ensure all cables are securely connected. Loose connections can lead to disruptions or even a complete loss of signal. If you’re experiencing display scaling and resolution issues, try adjusting these settings to suit the projector’s optimal viewing. Don’t worry, this process is often simple and only requires a few clicks. Overall, patience is key when dealing with these issues, as many can be resolved with a bit of persistence and effort.
Ensuring all cables are securely connected
Are you experiencing connection issues when trying to connect your laptop to a projector? Don’t worry, it happens to the best of us! There are several troubleshooting methods you can try to resolve the issue. Firstly, check for any driver updates or compatibility issues between your laptop and the projector. Ensuring all cables are securely connected is also crucial to establishing a stable connection. Additionally, be mindful of display scaling and resolution issues that can arise and play around with your display settings until you find the best option for your projector. With these simple tips, you can enjoy seamless and successful connections to your projector every time.
Resolving display scaling and resolution issues
Connecting your laptop to a projector is usually a simple process, but it’s not uncommon for technical glitches to occur. Some of the most common connection issues include outdated drivers, cables that aren’t securely attached, and scaling and resolution problems. Fortunately, troubleshooting these issues is often straightforward and can be accomplished without calling in an expert. To ensure that your laptop is working properly, you’ll want to check that all drivers are up to date and that your laptop and projector are compatible. If you’re using cables, make sure they’re plugged in firmly. Finally, if you’re having issues with scaling or resolution, check the settings on your laptop and projector. With just a few quick fixes, you’ll be back up and running in no time.
Using Apps to Enhance Wireless Projection

Are you tired of dealing with wires when connecting your laptop to a projector? Fortunately, there are apps that allow you to enhance your wireless projection experience. For instance, the ProjectorPlug app makes it possible for you to wirelessly cast content from your laptop to the projector, no matter the distance. With this app, you don’t have to worry about staying near the projector, giving you more mobility. In addition to that, meeting apps like Otter.ai can improve efficiency during your meetings. You can use this app to transcribe and save meeting notes, allowing you to focus more on the discussion. With the right apps, wireless projection is made much more enjoyable and efficient.
Wirelessly casting with the ProjectorPlug app
When it comes to wireless projection, there are a variety of apps available that can help enhance your experience. One great option is the ProjectorPlug app, which allows you to cast your laptop screen wirelessly to a projector or TV. It’s easy to set up and use, and you can even control your mouse and keyboard remotely using your phone or tablet. Another useful app for meetings and presentations is Otter.ai, which uses AI-powered tools to automatically transcribe and caption your speech in real-time. This can be incredibly helpful for attendees who are hard of hearing, as well as for anyone who wants to quickly review the key points covered during the meeting. Overall, using apps to enhance your wireless projection experience can help you work more efficiently and effectively, while also making the process more enjoyable.
Improving efficiency with meeting apps like Otter.ai
In today’s digital era, wireless technology has become an integral part of our daily life. When it comes to presentations, it is crucial to make sure that the technology used is reliable, efficient, and straightforward. There are different applications available to enhance the wireless projection experience for your laptop. With the ProjectorPlug app, you can easily wirelessly cast content from your phone, tablet or computer to any device with a screen and wifi connection, ensuring that you can present your work wherever and whenever you need it. Additionally, meeting apps like Otter.ai provide an easy way to keep notes and record meetings. They offer intelligent audio transcription features that can boost efficiency, making it possible to review all relevant information even after the meeting is over. By taking advantage of these tools and making sure your laptop’s display settings are optimized, you can create a seamless projection experience.
Tips and Tricks for a Seamless Projection Experience
When connecting your laptop to a projector, there are a few tips and tricks that can ensure a seamless projection experience. One important consideration is to optimize your display settings for the best viewing. This means adjusting things like resolution and scaling to ensure the projected image is clear and crisp. Additionally, managing multiple displays and projectors can be tricky, but utilizing keyboard shortcuts can give you quick access to important settings and help make switching between displays easier. It’s also important to make sure all cables are securely connected and to troubleshoot any compatibility issues that may arise. With a little bit of planning and preparation, connecting your laptop to a projector can be a hassle-free process.
Optimizing display settings for best viewing
When connecting your laptop to a projector, there are a few tips and tricks that can help ensure a seamless experience. First, it’s important to optimize your display settings for the best viewing. This might include adjusting the resolution, refresh rate, or aspect ratio to match your projector’s specifications. You’ll also want to make sure you’re managing multiple displays and projectors efficiently. Keyboard shortcuts can come in handy here, allowing you to quickly switch between different display modes or adjust settings. Finally, consider utilizing apps that can enhance wireless projection. For example, the ProjectorPlug app allows you to wirelessly cast your screen, while meeting apps like Otter.ai can improve efficiency by automatically transcribing and organizing notes. By taking advantage of these tips and tricks, you can ensure that your laptop-to-projector connection runs smoothly and efficiently.
Managing multiple displays and projectors
Connecting your laptop to a projector can be a daunting task, but with a few tips and tricks, you can make it a seamless experience. Firstly, optimize the display settings on both your laptop and projector for the best viewing experience. If you’re using multiple displays or projectors, it’s essential to manage them correctly to avoid confusion. Secondly, use keyboard shortcuts for quick access to settings and save time. It’s also essential to ensure all cables are securely connected to avoid any interruptions during your presentation. Lastly, if you’re looking to enhance wireless projection, consider downloading apps such as ProjectorPlug, which will enable you to wirelessly cast your laptop to the projector. Meeting apps like Otter.ai also help in increasing your efficiency by transcribing meeting notes. With these tips and tricks, you’ll connect your laptop to the projector seamlessly and showcase your presentations with confidence.
Utilizing keyboard shortcuts for quick access to settings
When it comes to connecting your laptop to a projector, there are a few tips and tricks that can make the process much smoother. Firstly, it’s important to optimize your display settings for the best viewing experience. This includes adjusting the resolution, scaling, and display size to suit your specific needs. Additionally, if you need to manage multiple displays and projectors, utilizing keyboard shortcuts for quick access to settings can save you a lot of time and hassle. Another tip is to ensure that all your cables are securely connected and to check for any driver updates or compatibility issues. Finally, when using apps to enhance wireless projection, consider using the ProjectorPlug app for wirelessly casting, and meeting apps like Otter.ai for improved efficiency during presentations. These tips will help you get the most out of your laptop and projector setup and ensure that you have a seamless projection experience.
Q1. What cable do I need to connect my laptop to a projector?
Ans: You will need a VGA, HDMI, or DisplayPort cable depending on your laptop and projector’s connectivity options.
Q2. How do I adjust the resolution on my laptop when connected to a projector?
Ans: Go to your laptop’s display settings and select the appropriate resolution for your projector.
Q3. Why is my laptop screen not displaying on the projector?
Ans: Ensure that your laptop’s output settings are set to the correct display output (VGA, HDMI, or DisplayPort) and that the projector is turned on and properly connected.
Q4. Can I connect my laptop wirelessly to a projector?
Ans: Yes, if both your laptop and projector support wireless connectivity such as Wi-Fi or Bluetooth. You may also need to download and install software or apps to enable wireless projection.